Preserving the ephemeral beauty of nature through dried plant specimens transforms fleeting botanical moments into timeless treasures that captivate for years to come.
The art of preserving botanical specimens has evolved from simple pressing techniques to sophisticated stabilization methods that maintain color, texture, and structural integrity. Whether you’re a hobbyist naturalist, professional botanist, or creative artist, understanding how to properly stabilize dried plant material ensures your specimens remain vibrant and scientifically valuable. This comprehensive guide explores the meticulous process of transforming fresh plants into preserved masterpieces that withstand the test of time.
🌿 Understanding Plant Stabilization: Beyond Simple Drying
Plant stabilization differs fundamentally from basic drying methods. While traditional drying simply removes moisture, stabilization replaces the plant’s natural sap with preserving agents that maintain flexibility, prevent brittleness, and lock in color. This chemical substitution process creates specimens that feel naturally supple rather than crispy or fragile.
The science behind stabilization involves replacing water molecules within plant cells with glycerin-based solutions or other preservatives. As moisture evaporates, the preservative takes its place, creating a stable environment that resists decay, mold, and color degradation. This molecular exchange requires patience and precision, but delivers results far superior to air-drying alone.
Professional herbaria and botanical institutions have refined these techniques over centuries, developing protocols that balance aesthetic preservation with scientific accuracy. Modern enthusiasts now benefit from this accumulated knowledge, adapted for home use with accessible materials and straightforward procedures.
Selecting the Perfect Specimens for Preservation
Success begins with choosing appropriate plant material at the optimal stage of development. Not all plants respond equally to preservation techniques, and timing dramatically affects final results. Understanding which specimens work best saves time and prevents disappointment.
Ideal Candidates for Stabilization
Plants with naturally sturdy structures, moderate moisture content, and vibrant pigmentation typically yield the best results. Eucalyptus, ferns, lavender, roses, and many ornamental grasses respond exceptionally well to stabilization. Their cellular structure readily accepts preservatives while maintaining architectural integrity.
Harvest specimens during their prime—flowers at peak bloom but before pollen drops, foliage when fully developed but not yet senescent. Morning collection after dew evaporates but before midday heat stresses plants provides material in optimal physiological condition. Avoid specimens with insect damage, disease spots, or mechanical injuries that become more pronounced during preservation.
Plants That Present Challenges
Extremely delicate flowers with tissue-thin petals, succulents with high water content, and plants with waxy coatings can prove problematic. While not impossible to preserve, they require modified techniques and may not achieve the longevity of more suitable specimens. Understanding these limitations helps set realistic expectations.
Essential Materials and Preparation Tools 🛠️
Gathering proper materials before beginning ensures smooth workflow and professional results. Quality tools and preservatives make the difference between specimens that last decades and those that deteriorate within months.
- Glycerin solution: Pharmaceutical-grade glycerin mixed with water (typically 1:2 ratio) forms the foundation of most stabilization processes
- Sharp pruning shears: Clean cuts prevent tissue damage that accelerates degradation
- Glass containers: Non-reactive vessels for soaking specimens without chemical interference
- Absorbent materials: Newspaper, blotting paper, or silica gel depending on your chosen method
- Weights and presses: For maintaining flat specimens during the stabilization process
- Sealable storage: Airtight containers or archival boxes for long-term protection
- pH-neutral adhesives: Museum-quality mounting materials when creating displays
Invest in quality materials from the outset. Cheap substitutes may seem economical initially but often compromise results, requiring you to repeat the process with better supplies later.
The Glycerin Absorption Method: Step-by-Step Precision
This technique works beautifully for woody stems, substantial leaves, and structural plants that benefit from maintained flexibility. The process requires several weeks but produces specimens with remarkable natural appearance and longevity.
Preparing Your Plant Material
Begin by making fresh cuts at the base of stems at a 45-degree angle, similar to preparing fresh flowers for a vase. This angled cut exposes maximum surface area for solution absorption. Remove lower foliage that would sit below the solution line, as submerged leaves often rot before preserving properly.
For woody specimens, gently crush stem ends with a hammer to further increase absorption capacity. This mechanical treatment breaks apart fibrous tissues without damaging the vascular system that transports preservative upward through the plant.
Creating the Stabilization Solution
Mix one part pharmaceutical-grade glycerin with two parts warm water in a clean glass container. Warm water helps glycerin dissolve more completely, creating a uniform solution. Some practitioners add a few drops of liquid dish soap to reduce surface tension and improve uptake, though this optional step depends on plant type.
Pour solution to a depth of 3-4 inches in your container—enough to keep stems submerged but not so deep that you waste expensive glycerin. Place prepared specimens in solution immediately after cutting to prevent air bubbles from blocking vascular pathways.
The Waiting Period: Monitoring Progress
Position containers in a cool, dim location away from direct sunlight. Temperature stability matters more than specific degrees—avoid areas with dramatic fluctuations. Check solution levels daily, adding more glycerin mixture as needed to maintain consistent depth.
The absorption process typically requires 2-6 weeks depending on plant thickness and density. Monitor leaves for color changes and textural shifts. As glycerin replaces water, foliage often darkens slightly and develops a supple, leather-like quality. Droplets of glycerin “sweating” from leaf surfaces indicate complete absorption.
Once stabilized, remove specimens from solution and gently blot excess liquid with paper towels. Hang upside down in a well-ventilated area for several days to allow surface glycerin to evaporate, leaving internal preservation intact.
Press Preservation: Capturing Botanical Details with Precision 🌸
For flowers, delicate leaves, and specimens intended for flat mounting, pressing combined with desiccant treatment creates exquisitely detailed results. This method excels at preserving intricate structures and subtle color variations that three-dimensional techniques might compromise.
Traditional Press Techniques
Layer specimens between sheets of absorbent paper, ensuring no parts overlap. Overlapping causes uneven drying and potential mold development. Arrange plants in aesthetically pleasing positions before pressing, as they’ll maintain exactly this configuration permanently.
Stack layered specimens between wooden boards or within a botanical press, applying even pressure across the entire surface. Excessive weight crushes delicate structures, while insufficient pressure allows curling and distortion. Change absorbent papers every 2-3 days initially, then weekly as moisture content decreases.
Accelerated Desiccant Method
Silica gel desiccant dramatically reduces drying time while better preserving color vibrancy. This technique works exceptionally well for flowers that fade quickly with air-drying. Pour a layer of silica gel in an airtight container, position specimens carefully, then gently cover completely with additional gel.
The fine crystals support delicate petals while rapidly absorbing moisture. Most flowers fully dry within 5-7 days. Check progress by carefully excavating one specimen—properly dried material feels papery and rigid. Remove specimens promptly once dry, as over-exposure to desiccant can cause brittleness.
Color Preservation: Maintaining Vibrant Pigmentation
Natural plant pigments degrade when exposed to light, oxygen, and fluctuating humidity. Even perfectly stabilized specimens fade if not properly protected. Understanding color preservation chemistry extends specimen lifespan dramatically.
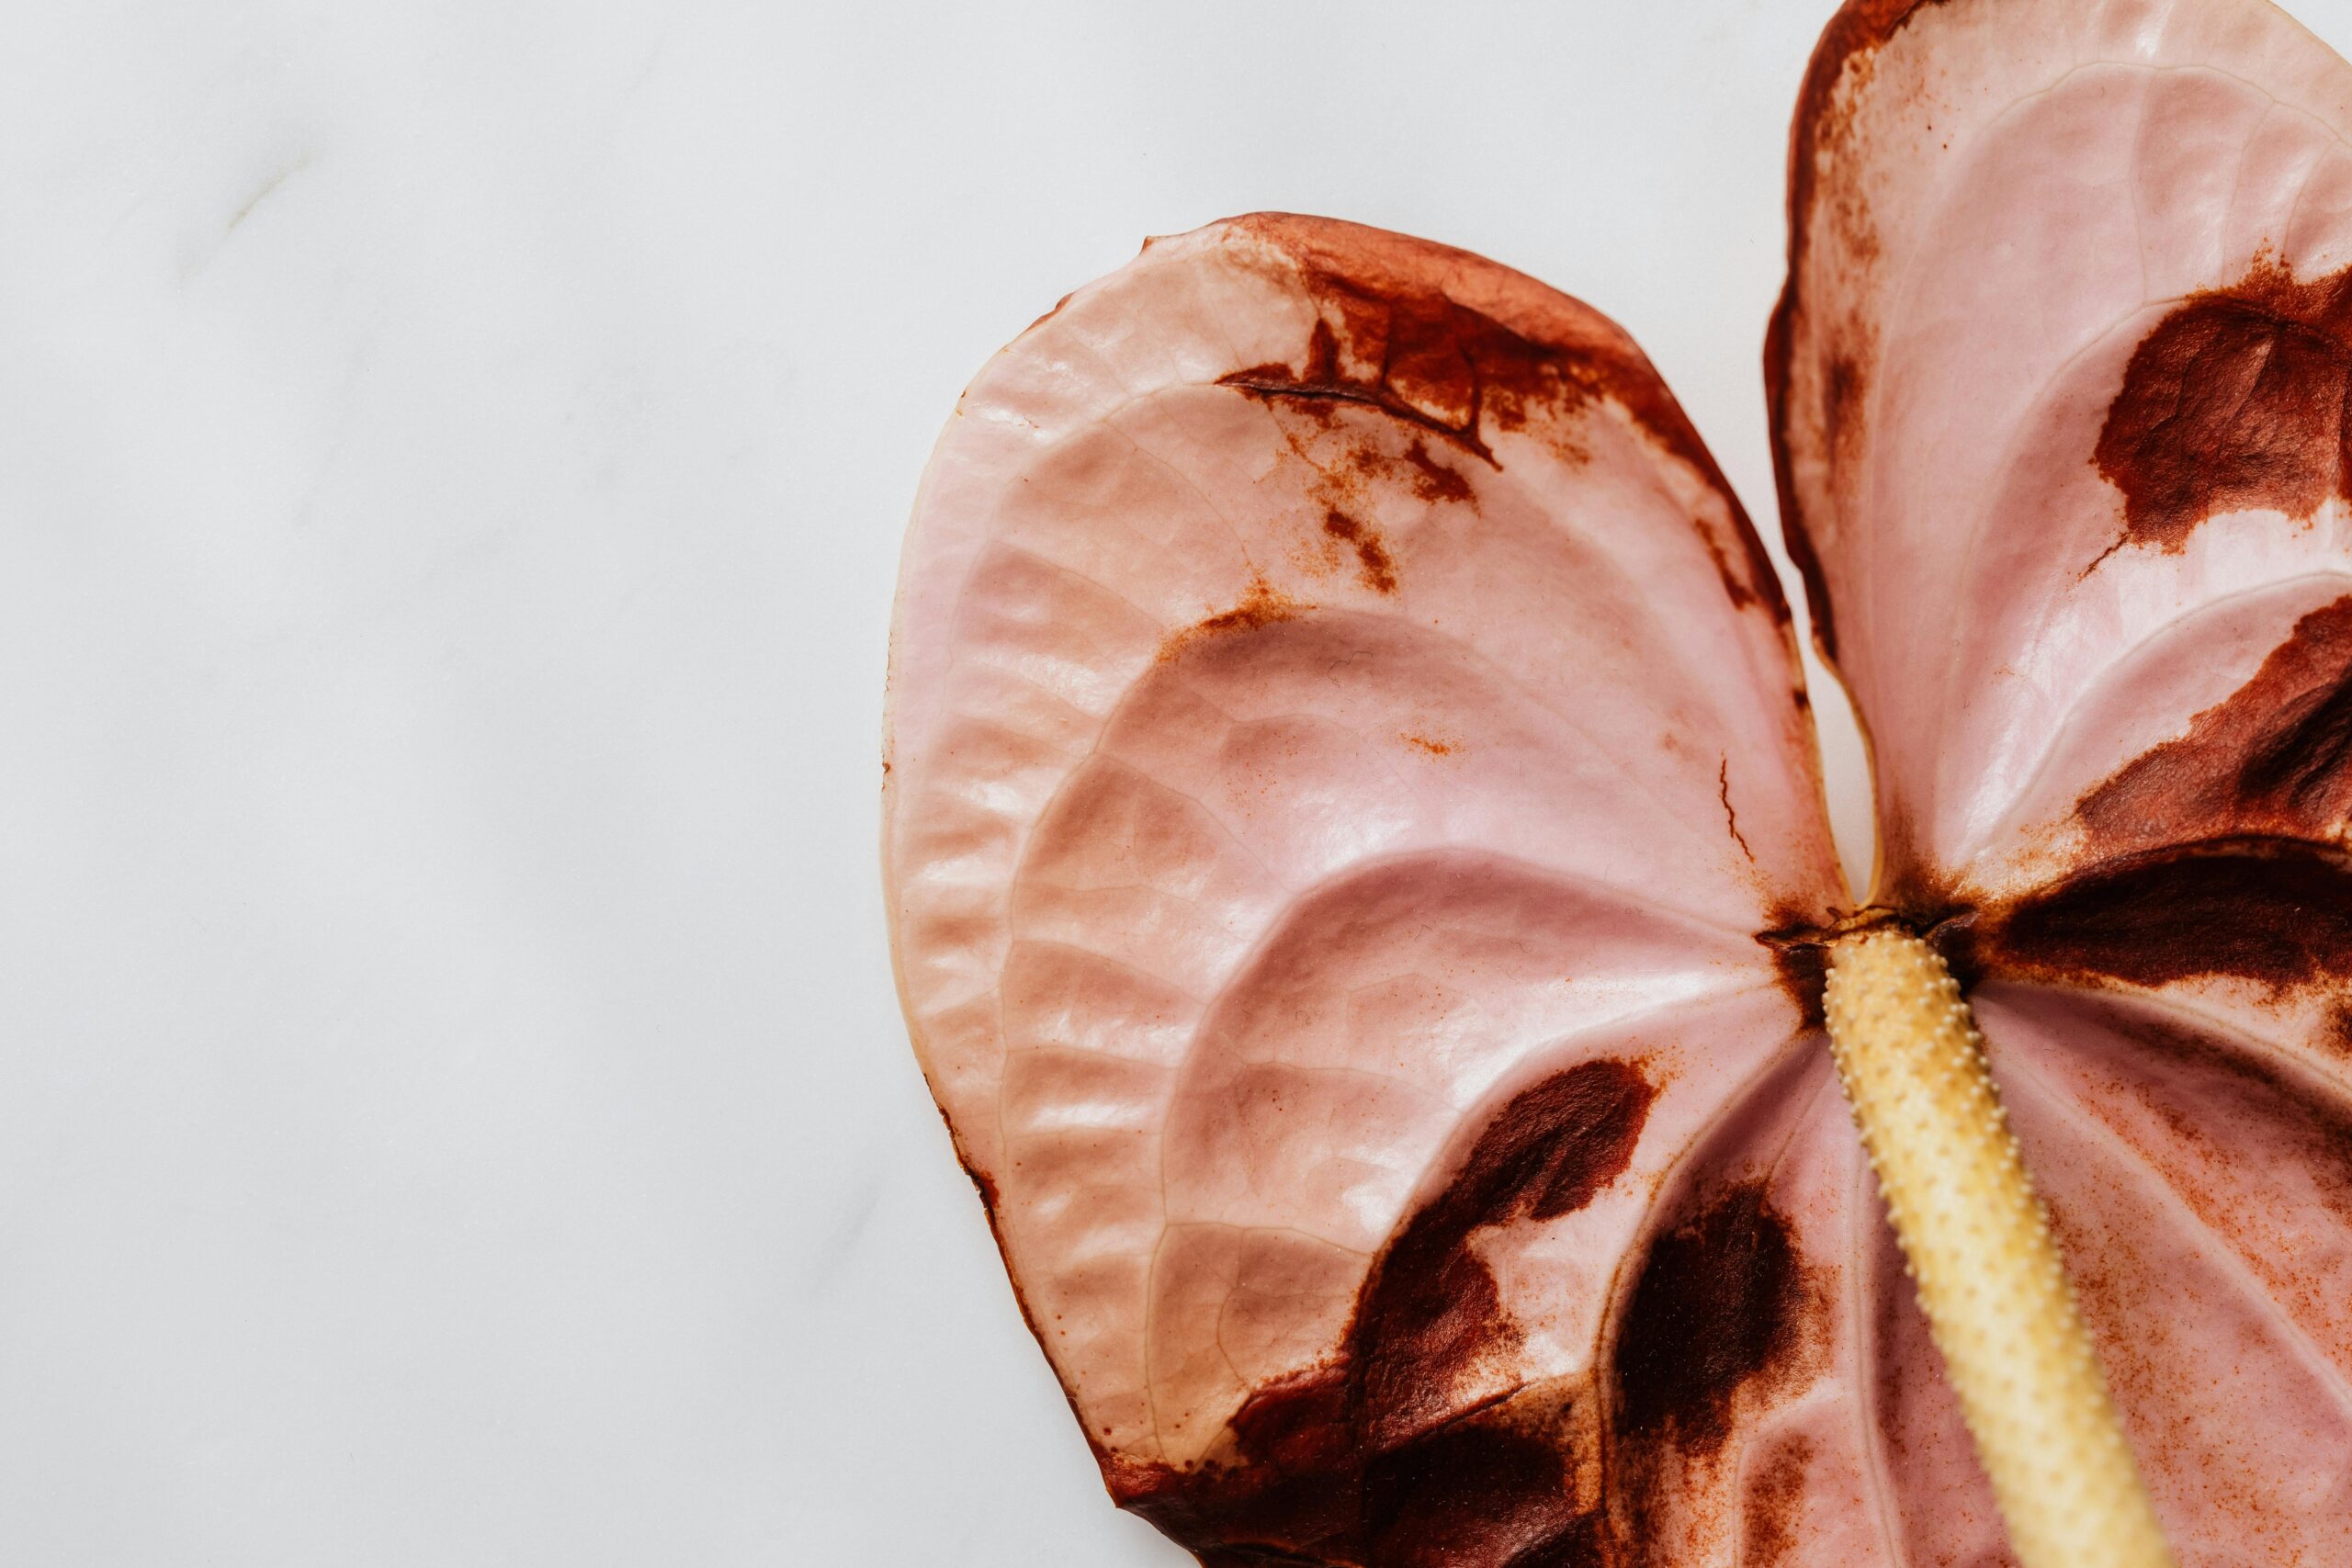
Chlorophyll, the green pigment in foliage, proves particularly unstable. Many green plants shift toward olive or brown tones during preservation—a natural process that can’t be entirely prevented but can be minimized. Harvesting younger foliage and excluding light during drying helps maintain greener hues.
Anthocyanins responsible for red, purple, and blue colors typically stabilize well, though blues often shift toward pink as pH changes during preservation. Carotenoid yellows and oranges generally remain stable. Selecting naturally pigment-rich specimens provides a buffer against inevitable color shifts.
Post-Preservation Protective Measures
UV-filtering glass or acrylic barriers protect displayed specimens from light damage. Even indirect sunlight accelerates fading—reserve the brightest locations for decorative reproductions rather than precious originals. Archival storage boxes with acid-free tissue protect specimens not currently displayed.
Some practitioners apply thin coats of matte acrylic sealer to add protective barriers, though this irreversible treatment changes surface texture. Test on less precious specimens before treating valuable material. Natural preservation without sealants remains reversible and more scientifically sound for serious botanical collections.
Storage Solutions: Protecting Your Preserved Collection 📦
Proper storage determines whether specimens last months or centuries. Professional herbaria maintain collections hundreds of years old by controlling environmental factors and handling specimens with meticulous care.
| Storage Factor | Optimal Range | Why It Matters |
|---|---|---|
| Temperature | 18-22°C (64-72°F) | Prevents brittleness and slows chemical degradation |
| Relative Humidity | 45-55% | Too dry causes crumbling; too humid encourages mold |
| Light Exposure | Minimal to none | UV radiation destroys pigments and weakens cellular structure |
| Air Quality | Pest-free, clean | Insects and pollutants damage specimens over time |
Invest in archival-quality storage materials—acid-free papers, lignin-free folders, and museum board mounting surfaces. Common cardboard and regular paper contain acids that migrate into specimens, causing yellowing and deterioration. The modest additional cost of archival materials provides exponential returns in specimen longevity.
Creative Applications: From Science to Art 🎨
Stabilized specimens serve dual purposes—scientific documentation and artistic expression. The same careful preservation techniques support both applications, though presentation methods differ based on intended use.
Scientific Documentation and Study
Botanical researchers preserve specimens as permanent records of plant species, documenting morphological details for taxonomic study. Properly prepared herbarium specimens include complete information—collection location, date, habitat notes, and collector identification. This metadata transforms preserved plants from mere decorations into valuable scientific resources.
Mount scientific specimens on heavyweight archival paper using pH-neutral adhesive or linen strips. Include a label with all relevant collection data. Store flat in folders within herbarium cabinets, organized taxonomically or geographically depending on collection scope.
Artistic Installations and Decorative Uses
Artists and designers incorporate preserved botanicals into wall art, jewelry, resin casting, and three-dimensional installations. The same preservation principles apply, though aesthetic considerations take precedence over scientific documentation requirements.
Frame pressed specimens between glass sheets for botanical wall art. Create wreaths and arrangements from glycerin-preserved branches and flowers. Embed small specimens in clear resin for jewelry and decorative objects. These applications transform preserved plants into accessible art that brings nature indoors year-round.
Troubleshooting Common Preservation Challenges
Even experienced preservationists encounter occasional setbacks. Understanding common problems and their solutions prevents frustration and material waste.
Mold Development During Processing
White or gray fuzzy growth indicates excessive moisture and inadequate air circulation. Remove affected specimens immediately to prevent spreading. Increase ventilation, reduce humidity, and change absorbent materials more frequently. Adding a small amount of isopropyl alcohol to glycerin solutions can inhibit mold without damaging plants.
Brittleness and Breakage
Over-dried specimens become fragile and prone to shattering. This typically results from excessive heat, over-extended drying times, or insufficient preservative absorption. Handle brittle specimens minimally and store in padded containers. Some brittleness can be reversed by briefly exposing specimens to slightly elevated humidity, though this risks other complications.
Color Fading or Undesirable Shifts
When colors fade dramatically or shift to unappealing tones, light exposure or chemical reactions are typically responsible. Store specimens in darkness between display periods. Accept that some color change is natural—work with the aged palette rather than fighting inevitable chemistry.
The Enduring Value of Botanical Preservation 💚
Preserving plant specimens connects us to nature’s rhythms while creating tangible records of botanical diversity. Each carefully stabilized leaf or flower represents a moment captured, a species documented, or a memory preserved. The meticulous care invested in proper preservation techniques ensures these natural treasures endure for future generations.
Whether your motivation stems from scientific curiosity, artistic expression, or simple appreciation for botanical beauty, the principles remain constant. Careful specimen selection, appropriate preservation methods, and thoughtful storage create results that honor the original plant’s beauty while extending its existence far beyond natural lifespan.
The patience required for proper preservation develops mindfulness and appreciation for natural processes. Each step—from harvesting through final storage—demands attention to detail that modern life rarely requires. This deliberate pace offers welcome contrast to our accelerated world, creating space for contemplation and connection with the natural realm.
Start your preservation journey with common, easily accessible plants to develop technique before working with rare or precious specimens. Learn from inevitable early mistakes, refining your approach with each batch. Over time, you’ll develop intuition for how different plant types respond to various preservation methods, allowing you to predict results and adjust techniques accordingly.
The specimens you preserve today may outlive you by decades or centuries if properly cared for. Consider this legacy aspect when deciding which plants to preserve and how to document your collection. Future botanists, researchers, or family members may appreciate not just the physical specimens but the records of when, where, and why you collected them.
Preserved botanical specimens bridge past and present, science and art, nature and human creativity. They remind us that beauty need not be fleeting, that with knowledge and care we can capture ephemeral moments and make them permanent. Each pressed flower or stabilized branch carries stories—of seasons passed, places visited, and the enduring human impulse to preserve what we find beautiful.
Begin your preservation practice today. Start simply with readily available materials and common plants. As skills develop and confidence grows, expand into more sophisticated techniques and challenging specimens. The journey from novice to accomplished botanical preservationist offers endless learning opportunities and deeply satisfying results that beautify your environment while connecting you more intimately with the natural world.